Step One: Apply orange polish to your whole nail (or black if you want to reverse it)
Step Two: Paint a line of black diagonally across the tip of your nail from left to right
Step Three: Paint a diagonal from the opposite side of your nail so that the tip is covered. You can go over the tip one more time to even everything out
There you go; a fast and easy way to add a little Halloween touch to your outfit. Want something a little more complex? Read on for mummies, candy corn, and more!
Another fairly simple design, candy corn nails are fun for Halloween and fall in general. Step One: Paint your nail white
Step Two: Paint a yellow strip across the middle of your nail, leaving a little of the white on the base and tip
Step Three: Depending on how you want the design on your nail, paint an orange strip either at the base or tip of the nail. Yay, you're all done!
This next design has a few more steps but is still pretty easy, though the result can look detailed (and pretty adorable). A fine nail polish brush was used for the bandages but a felt-tip marker works just as well (especially for shaky-hands).
Step One: Apply a coat of pale grey
Step Two: Apply a coat of a pale, sheer yellow
Step Three: Paint a band of black across the upper/center part of your nail, below the tip. It can be uneven and thicker in the center, almost like a cat's pupil!
Step Four: With your pen or nail brush, make a few criss-crossing lines to represent bandages. There is no real pattern to this, just experiment until you like how it looks. Add two red dots for the eyes.
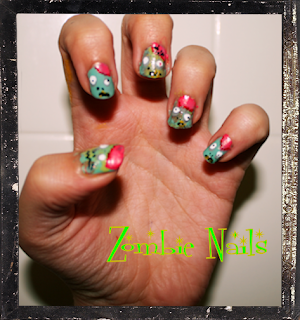
This last design is the most time-consuming, but the steps themselves are not too difficult. It is an interesting use of that pretty mint color that has been popular the last few years. You can make these zombies as adorable or decayed as you like!
(click the photo for more detail)
Step One: Apply a coat of pale mint polish.
Step One-B: For a more decayed zombie, add splotches of browns and greens. While still wet, pat your nail to blend and add texture.
Step Two: Depending on how you want your design oriented, paint a messy pink strip in the upper right corner of your nail. This is going to be the brain!
Step Three: To add more dimension, go over the pink with a lighter pearly pink polish.
Step Four: Apply two pale grey (purple would work, too) dots in the center of your nail
Step Five: Add white dots over the grey (you can leave the eyes white, which looks very zombie-ish and creepy, or you can add pupils)
Step Six: With a nail brush or pen add dots for the pupils and nose. Make small splotches for mouths.
Step Seven: Add yellow dots for teeth, zig zag mouths, grey swirly designs on the brain...at this point, it is all optional and up to you. Design the zombie of your choice! And really, how can you make a mistake? It is a zombie, after all.
Hope you enjoyed these spooky-fun nail tutorials! Check back tomorrow for more of the 13 Days of Halloween countdown!


No comments:
Post a Comment